What Is a Compression Router Bit and When Should You Use One?
Compression router bits explained: how they work, upcut vs downcut vs compression, i1 crossover point, and when to use X90/X99 for CNC nesting in UK workshops.
What Is a Compression Router Bit and When Should You Use One?
If you have ever cut laminated chipboard or plywood on a CNC and ended up with a clean bottom edge but a chipped top — or vice versa — a compression router bit is the solution. It is the single most important bit type for anyone cutting double-sided laminated panels, and understanding how it works will save you both time and material.
Yet compression bits are also the most misunderstood tool in the CNC arsenal. Operators buy them expecting magic, then get poor results because they do not understand the critical crossover point. This guide explains everything: how compression bits work, the crossover point that makes or breaks your results, when to use them versus other spiral types, and which ITA Tools compression bits deliver the best value for UK furniture production.
The problem compression bits solve
To understand why compression bits exist, you first need to understand the limitation of standard spiral router bits.
Upcut (positive spiral) bits rotate in a way that pulls chips upward, away from the material and toward the spindle. This is excellent for chip evacuation and produces a clean bottom edge — but it tears the top surface upward, causing chipout on the face that is visible in most furniture applications.
Downcut (negative spiral) bits do the opposite. They push chips downward, pressing the top surface fibres firmly into the material. The result is a perfectly clean top edge — but the bottom edge gets torn and ragged as chips are forced down through the exit point.
For single-sided materials (like raw MDF or unlaminated chipboard), this is manageable — you simply orient the visible face toward the clean-cutting direction. But for double-sided laminated panels — Egger or Kronospan melamine-faced chipboard, for example — both surfaces must be clean. There is no "hidden" side.
The compression bit solves this by combining both geometries in one tool. The lower portion has an upcut spiral that pulls chips upward, producing a clean bottom surface. The upper portion has a downcut spiral that pushes the top surface down, keeping the face laminate clean. The material is compressed from both sides simultaneously — hence the name.
How compression bits actually work: the crossover point explained
The critical dimension on any compression bit is the crossover point, typically designated as "i1" in tool specifications. This is the exact height on the bit where the upcut spiral transitions to the downcut spiral — the point where the two opposing forces meet.
Here is why i1 matters so much:
The crossover point must always sit below the top surface of your material. If you are cutting 18 mm laminated chipboard and your bit has an i1 of 4.5 mm, the crossover is well below the top surface. The upcut section (from 0 to 4.5 mm) cleans the bottom, while the downcut section (from 4.5 mm upward) pushes the top surface down. Both faces end up clean.
But if i1 is above your material thickness, the compression effect is lost. Imagine cutting a 4 mm HPL sheet with a bit whose i1 is 5.5 mm. The entire cut happens within the upcut zone — the downcut section never engages the material. You get the same result as a plain upcut bit: clean bottom, chipped top.
This is the single most common mistake we see with compression bits in UK workshops: operators buy a compression bit designed for 18 mm chipboard and then try to use it on 4 mm material without checking i1. The result is disappointing — and entirely avoidable.
Practical rule: Always check the i1 specification before ordering. Your material thickness must be greater than i1 for the compression effect to work on both surfaces.
The first pass must be deep enough
Even with the correct i1 for your material, compression bits require one more condition: the first plunge must go deeper than the i1 crossover point. If your first pass is shallower than i1, only the upcut section engages — and you get upcut results (clean bottom, rough top).
For most nesting applications in 18 mm chipboard, this is not an issue — you are cutting through the full material thickness in one pass. But for multi-pass operations, shallow pocket cutting, or thinner materials, you need to ensure that your first engagement goes below i1.
If your CNC cannot plunge deep enough in a single pass (some lighter machines have power limitations), a compression bit may not be the right choice. In that case, consider a downcut spiral for top-face-critical applications, or a dedicated PCD nesting bit (like the DTE series) which uses brazed diamond inserts positioned on axial angles to achieve clean dual-face cutting through a different mechanism entirely.
Upcut vs downcut vs compression: the complete comparison
| Factor | Upcut | Downcut | Compression |
|---|---|---|---|
| Top surface quality | Poor (chips upward) | Excellent | Excellent (if i1 is correct) |
| Bottom surface quality | Excellent | Poor (chips downward) | Excellent (if i1 is correct) |
| Chip evacuation | Excellent (upward) | Poor (packed downward) | Good (mixed) |
| Heat management | Good | Poor (chip packing) | Good |
| Best material | Solid wood, deep pockets | Thin laminates, veneers | Double-sided laminates, plywood |
| Risk | Top surface tearout | Overheating, chip packing | None if i1 is correct |
| Feed rate capability | Highest | Lowest | Medium-high |
| CNC nesting suitability | Poor for laminates | Poor for through-cuts | Excellent |
When to use each:
Upcut bits are ideal when chip evacuation is the priority and the top surface is not visible — deep pockets, slots, solid wood profiling, and aluminium cutting.
Downcut bits excel for shallow operations where the top face must be perfect — thin veneers, non-through dados, letter carving, and operations where chip packing is manageable due to shallow depth.
Compression bits are the standard choice for CNC nesting of double-sided laminated panels, plywood through-cutting, and any application where both faces must be clean in a single pass.
ITA Tools compression router bits: X90 and X99 series
X90 — The Reliable Standard
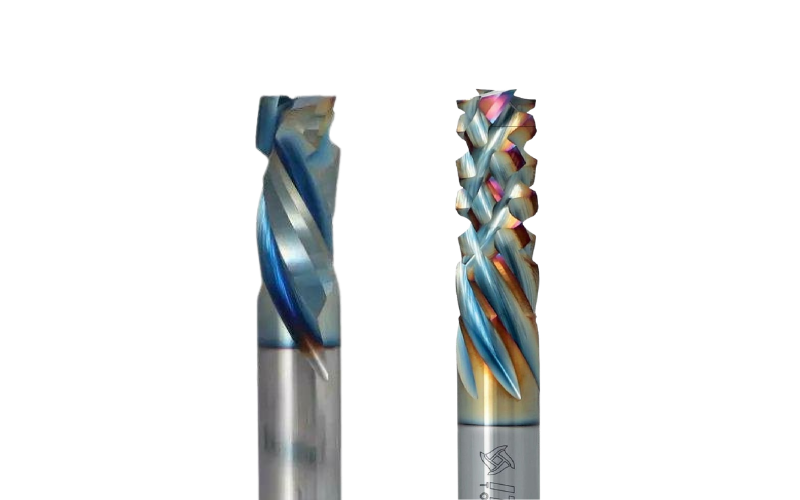
The X90 series uses a standard compression geometry (Z2+2 — two upcut, two downcut) with an enhanced carbide grade designed for panel materials. Available from 8 mm diameter upward.
Strengths: Consistent, predictable performance. Good tool life in chipboard and MDF at moderate feed rates. Price point roughly 30-40% below equivalent European-brand compression bits.
Best for: General-purpose CNC nesting and crosscutting in workshops that do not want to invest in diamond tooling. A safe, proven choice with no surprises.
X99 — The Game Changer
The X99 is a genuinely different tool. It features a proprietary Z2+6 geometry (two main cutting edges plus six chip-breaking elements), a harder carbide grade with reduced cobalt content, and a dual-layer Platinium coating consisting of a tribological layer to reduce friction and a hardening layer for wear resistance.
Real-world results: Field testing across multiple UK and European workshops has produced results that have surprised even ITA Tools' own technicians. At 20,000 RPM and 20 m/min in laminated chipboard, X99 bits are achieving tool life that approaches PCD diamond in many standard production scenarios.
One client ran X99 bits through four consecutive shifts of continuous nesting without tool changes. The bit — costing approximately €30 — held up against chipboard that would normally destroy a standard carbide compression bit in a fraction of that time.
The cost argument: At roughly one-third the price of a PCD diamond nesting bit, the X99 offers an extraordinary cost-per-metre ratio for workshops operating at moderate speeds. For operations that cannot justify the upfront investment in diamond, or for operators who want a disposable tool they can run hard without worrying about resharpening schedules, the X99 is rapidly becoming the default recommendation.
What X99 does not replace: For high-speed nesting above 25 m/min, or for workshops requiring 10,000+ linear metres between tool changes, PCD diamond (DTE, DTF, DTM) remains the better choice. The X99 is not a diamond replacement for heavy production — it is a diamond alternative for moderate production that punches dramatically above its price point.
For a deeper dive into diamond vs carbide economics, see our guide: Diamond vs Carbide Router Bits: When to Switch.
Choosing the right compression bit: a practical framework
Question 1: What material are you cutting?
Laminated chipboard — X90 or X99 (carbide) or DTE/DTF (diamond). The X99 is the sweet spot for most UK workshops at moderate speeds.
MDF — Standard carbide compression is adequate for light work. For production, move to PCD (DTF series) or at minimum X99 with its enhanced coating. MDF's fine dust is brutal on standard carbide.
Plywood — Compression bits must be sharp to handle alternating grain. The X99 performs well; for higher volumes, consider the DTE TURBO variant designed specifically for plywood.
HPL / Corian / Solid Surface — Compression bits work but are not the first choice. The DTS diamond bit (two opposing axial PCD inserts) is the dedicated solution for these materials.
Question 2: What is your material thickness?
Check the i1 specification against your panel thickness. For 18 mm chipboard (the UK standard), most compression bits with i1 of 3.5-5.5 mm work perfectly. For thinner materials (under 8 mm), verify that i1 is well below the thickness — or consider a different bit type entirely.
Question 3: What feed rate does your CNC run at?
Under 15 m/min — X90 is sufficient and cost-effective.
15-20 m/min — X99 delivers the best value at this speed range.
20+ m/min — Consider PCD diamond (DTE or DTM) for maximum tool life at high speeds.
Question 4: What is your monthly volume?
Under 50 sheets/month — Carbide compression (X90 or X99). The economics of diamond do not justify the upfront cost at this volume.
50-200 sheets/month — X99 or entry-level PCD (DTE). This is the crossover zone where both options make financial sense.
200+ sheets/month — PCD diamond is almost certainly the better long-term investment.
Common compression bit mistakes and how to avoid them
Mistake 1: Ignoring the i1 specification. We have covered this in detail above, but it bears repeating: check i1 against your material thickness every time you order a new compression bit. A 4.5 mm i1 bit works brilliantly on 18 mm chipboard but fails completely on 3 mm laminate.
Mistake 2: Using compression bits for shallow pockets. Compression bits need to plunge past the i1 crossover to work correctly. For shallow pockets, dados, and grooves where depth is less than i1, use a downcut bit instead — you will get a clean top surface without the complexity of managing the crossover point.
Mistake 3: Running standard carbide compression bits in MDF. MDF's extremely fine, abrasive dust destroys standard tungsten carbide at an alarming rate. If you must use carbide in MDF, use the X99 with its enhanced grade and coating. Better yet, move to PCD diamond for any serious MDF production.
Mistake 4: Expecting compression bits to fix a dust extraction problem. If chips are not being evacuated properly, no bit geometry will save you. Compression bits manage chip direction, not chip removal. Ensure your extraction system is working properly before blaming the tool.
Mistake 5: Using compression bits for edge trimming (contour finishing). Compression geometry is designed for through-cutting. For edge finishing operations, use a dedicated contour bit like the DTE TURBO, which has small PCD inserts and large chip gullets optimised for peripheral cutting along the edge of a panel.
Frequently Asked Questions
What does "compression" mean in a router bit?
A compression router bit compresses the material from both sides during cutting. The lower upcut section pulls the bottom surface up, while the upper downcut section pushes the top surface down. This dual action produces clean edges on both faces of the panel in a single pass.
Can I use a compression bit for all my CNC operations?
No. Compression bits are designed specifically for through-cutting operations where both faces need to be clean. They are not suitable for shallow pockets (where only the upcut section engages), deep slotting (where chip evacuation becomes an issue), or edge trimming (where contour-specific geometry performs better).
What is the i1 value and why does it matter?
The i1 value (in millimetres) is the crossover point — the height on the bit where the upcut spiral transitions to the downcut spiral. Your material must be thicker than i1 for the compression effect to work. If your material is thinner than i1, you effectively have an upcut bit and the top surface will chip.
How fast can I run a compression bit?
Standard carbide compression bits (X90) work well at 10-15 m/min. Enhanced carbide (X99) handles 15-20 m/min reliably. For speeds above 20 m/min, PCD diamond nesting bits are the better choice for sustained production quality.
Are compression bits better than diamond nesting bits?
They serve different purposes and price points. Compression bits (carbide) cost roughly one-third of PCD nesting bits but have shorter tool life. They are ideal for moderate volumes and budgets. PCD nesting bits (DTE, DTF, DTM) use brazed diamond inserts with axial positioning to achieve clean dual-face cutting — a fundamentally different mechanism that delivers far longer tool life at higher speeds.
Can I resharpen a compression bit?
Standard carbide compression bits (X90, X99) are generally used until worn and then replaced — they can sometimes be resharpened once, but the economics typically favour replacement. PCD diamond bits can be resharpened 3-4 times, which dramatically extends their lifetime value.
What is the difference between the X90 and X99?
The X90 is a standard compression bit with enhanced carbide. The X99 uses a harder carbide grade (less cobalt), Z2+6 geometry (two cutting edges plus six chip-breaking elements), and Platinium dual-layer coating (tribological + hardening). The X99 delivers significantly longer tool life — approaching PCD in some applications — at a modest price increase over the X90.
Want to try compression bits in your workshop? The ITA Tools X90 starts at under £35 and the X99 at under £45 — less than most branded European compression bits. Browse our full compression router bit range at smarterproduction.co.uk, or contact us for guidance on matching the right bit to your material and machine. We will help you check the i1 specification, recommend the optimal feed rate, and calculate whether carbide or diamond makes more sense for your production volume.